
The year is 1987, and I am still a kid. One of my neighbours is probably 6-7 years older than me, and we hang out quite often playing around with our C64. Most guys in our small city just play games, occasionally we also do that, but we also spend hours trying to do stuff on it; either by BASIC programming or just trying to paint a decent picture in Koala Paint. But 1987 changed my life. My neighbour bought one of the first Amiga 500 systems to hit the streets in Denmark that year.
I still remember how he proudly rang the door bell of my parents house. I opened the door, and outside he was sitting on his red moped, with a shiny new A500 box placed right infront of his feet across the moped. He just picked up the system 10km away like that, and wanted to let me know I should follow him over to his house and be a part of this big day..
What a day. Colors. Stereo music. Clear and crisp samples with explosions, real speech, real instruments – the music sounded so real! Multitasking. Fancy 3.5″ floppydisks. Deluxe Paint. Aegis Sonix. Defender of the Crown. It all blew my mind! His shiny new Amiga 500 with Kickstart 1.2 and a beautiful embossed C= (chicken lips) logo.. and then it also had this amazing keyboard, which felt so professional compared to the keyboard of the C64.
In 1989 I finally had enough money to buy my own Amiga 500. I had been craving it for so long, and been reading as much as I could about it.. how to use CLI/AmigaDOS for instance. My A500 was now with Kickstart 1.3, but, there was also some other cosmetic changes. The embossed C= logo was replaced by a C= logo plate. And… where was the C= key on the keyboard? Infact.. why did the keyboard feel different? I was a little bit sad, that the keyboard was not as great.
Some years later, my friend started to study at the university. Commodore was doing a deal for students – get a 50% discount if you buy an Amiga 2000 and show your student card. And so he did! What a machine. So professional. At this point he was now driving a small car, and he drove 150km to get the machine from one of the big Amiga dealers at that time (EuroTrade in Aarhus, Denmark). I got a phonecall when he came back home.. he had something to show me. The Amiga 2000 had a 2088 bridgeboard, 2MB of RAM – and with a matching 1084S monitor. Also he got a 24 needle Star LC-24-10 printer! This was the bomb! 🙂
… the chicken-lips Amiga 500 was sold shortly after to one of my classmates, who happened also to live around us, so he got a good deal and I introduced him to Soundtracker, but that’s another story.. 🙂
Years passed. Decades passed. And one day I thought of that chicken-lips Amiga 500 again. I contacted my old classmate, in a tiny hope that he maybe would still have it – unfortunately it was gone long time ago…..
In around 2001 I was lucky to get my hands on quite a big Amiga batch which originated from one of the previous officially appointed service centres of Commodore in Denmark. Among all the stuff, there was a Danish chicken-lips keyboard. It was disgusting. It was filthy and greasy. There was probably leftovers from a few pets inside of it too 😀 – but it was a chicken-lips.. a Danish version.. this was rare for me. I stored it among other things at room temperature.
Until 2019. I finally digged it out and unwrapped it again, and it was still disgusting. I actually had the feeling it might not even work…. so wearing rubber gloves (it was that disgusting) I connected it to my A500 to make a test. It actually worked pretty OK!
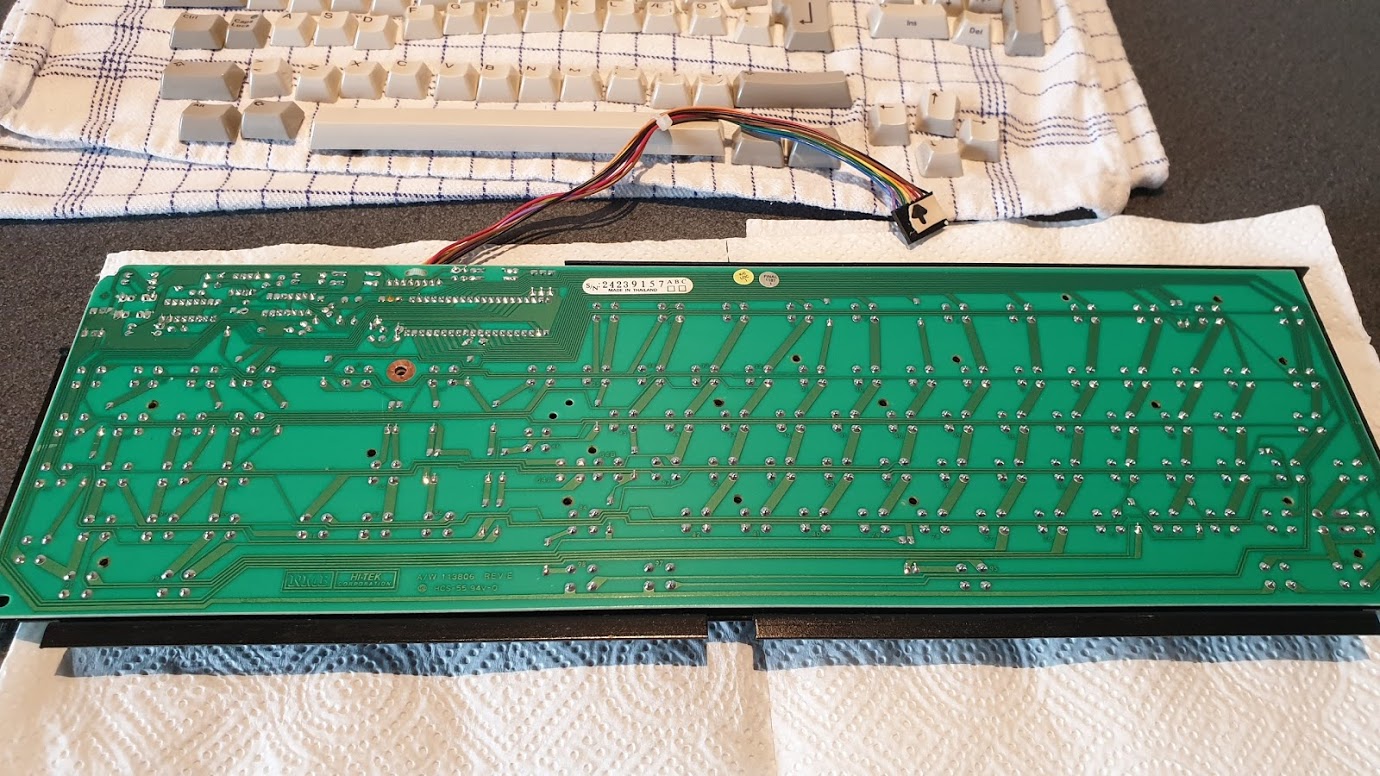
I vacuum cleaned it – and took this photo of it:

This model is very different from the mass production keyboards which came out later with the A500. The black base plate is in metal (plastic later on) and the entire print is soldered on the backside – so there is a thin piece of plastic to cover on the backside to avoid any short circuits from happening after you install it in the Amiga.
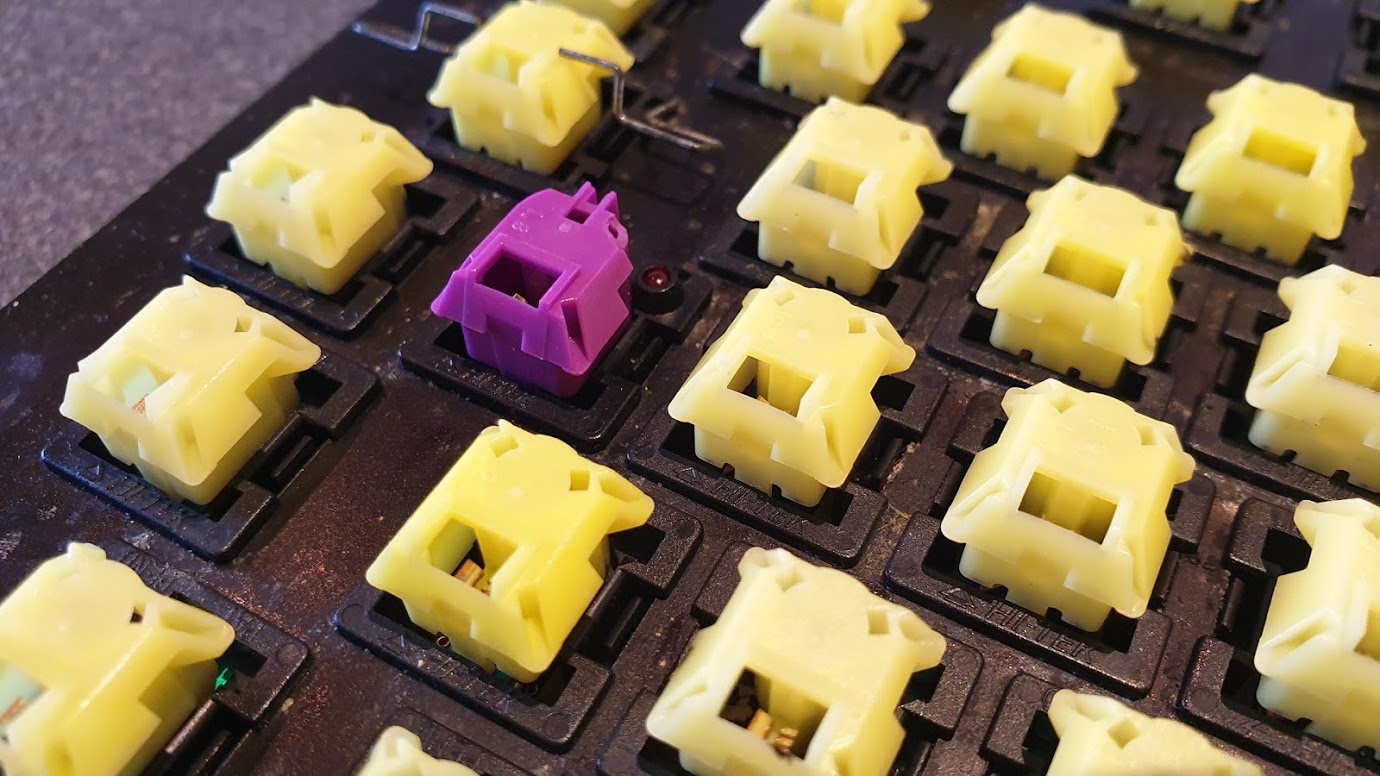
Each key is using the socalled “space invaders” keyboard clip. All the keys are lower and shaped more ergonomically. Typing on this keyboard both sounds and feels SO different.
I carefully removed all the keys – and I decided to use my dishwasher to clean them, as they were really dirty and greasy. My dishwashers minimum temp is 45 degress celcius, the cycle takes 29 minutes. I decided to do one cycle without soap first, and I stopped it after 14 minutes, before the heating/dry cycle started to kick in. I stored the keys in the container where I usually store knifes, spoons etc. so they would not fly around in the machine and potentially be damaged.

The first cycle turned out not bad, I could clearly see a difference. I added one soap-capsule, and ran one more cycle. Now they came out really really nice!
Finally I dropped them into a plastic box with hot water, added a bit of totally standard “VEL” dishwashing soap – and shaked the box softly for a few minutes. They came out as new!
My final process was to use isopropyl alcohol and individually clean each key with that using a dry paper towel. This removed any grease feeling and made them feel totally like new.
The electronicspart was really dirty too. There was so much hair, dust and disgusting sticky stuff on it. I tried to clean it by hand.. but it did not really come off easily. I decided to take a maybe risky leap of faith…
I put it into the dishwashers aswell. I put flat at the upper tray, electronic side up, and the space-invaders keyboard side down. By turning it in this direction, it was my guess that the machine would spool out some of the dirty stuff more efficiently, as this was the truly dirty part and needed some serious cleaning. I ran the 45 degreess cycle again for 14 minutes, water only (no soap! no capsules!), stopped it, and took it out – it looked so much better.
After this I started a 2 hour 60 degrees full cycle with an empty dishwashing machine with a soap capsule to clean it, in case any dangerous stuff from this dirty keyboard would be stuck in the machine and end up on my plate 🙂
I continued to clean it by hand with isoproylalcohol, and despite of the good results after the wash, I was still able to pull out dust, hairs and dirt from the space-invader springs. Finally it started to look very good….
Some parts of the black metal had rust on it, so I carefully applied WD-40 oil on cotton tips and painted the black metal with this, being careful not to touch the space invader springs or any parts of the electronics.
Next day, the rust was loose; so I could wipe most of it off with a piece of dry paper towel. Also I added some black paint to it, to make it all look nice.
I let the entire thing dry for 3 days, with the space invader part turning down – and with dry paper towel below to help to “suck out” some potential water or fluids.
There was 2 of the space invader clips which was not feeling the same way when I pressed them down, but it was an easy fix. I just had to squeezs the two tiny metal clips inside o fthe space invader clip together a bit.
I applied all the keys back on the clips and tested all the keys with Amiga Test Kit software – it works like a dream! Not only that, it looks new.. my Amiga 500 looks really new with this keyboard, and not to mention, the nostalgic value by finally having this keyboard is amazing and the feel when typing is out-of-this-world!
